Safety Information Factsheets
Tractor Safety
The roll-over simulator was developed by a student in the Agricultural Mechanization and Business program to educate the public about tractor roll-overs and ROPS. This trailer was a part of his senior design "Capstone" project.
ROPS - Roll Over Protective Structure
- If you have a ROPS - wear your seatbelt.
- If you do not have a ROPS - don't wear your seatbelt.
Pre-Operational Safety Checks
- Adorn all appropriate PPE.
- Check all fluid levels.
- Check for leaks and structural damage to the machine.
- Enter the machine using three points of contact.
- Adjust the seat to comfort and fasten the seat belt if Rollover Protective Structure (ROPS) is employed.
- Familiarize yourself with controls and movements.
- Lock brakes together if traveling on roadways.
- Ensure slow-moving vehicle signage is present and visible.
Operation of Machine
- Check for bystanders.
- Be familiar with the terrain and work area to identify any debris or obstacles.
- Ensure the machine is in a neutral position before starting, and the PTO is disengaged, and the clutch is depressed.
- Carry loads as low as possible (if loader equipped) and always on the drawbar.
- Always keep the PTO properly shielded and walk around the tractor and PTO driven implement.
- Be conscious of tipping points.
- Drive slow enough to keep control over unexpected hazards and do not stop suddenly or make sudden movements.
- Travel up/down slopes rather than across, taking extra care when ascending or descending steep slopes.
Ending Operations
- Park on even ground.
- Lower the implement and place level on the ground.
- Move controls to ensure the machine is stable, and pressure is removed from hydraulic lines.
Cleaning Up
- Remove foreign material from around the engine.
- Keep the work area and implement in a safe, clean, and tidy condition.
Don't
- Do not use faulty equipment.
- Never carry passengers.
- Do not modify ROPS.
- Never exit the machine with the boom overhead.
- Never start an engine in a closed shed or garage.
- Never get off a moving tractor or leave the engine running.
- Never refuel while the engine is running or hot.
Safe Load
Description
The objective is to provide basic information regarding safe load and proper hauling procedures for equipment
transport.
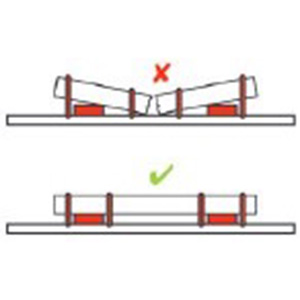
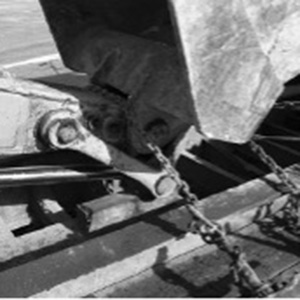
Tiedown Construction and Maintenance
The tie-down must be constructed so the driver can tighten it. All components of the tie-down must be in correct working order.
- No knots
- No obvious damage
- No weakened parts or sections
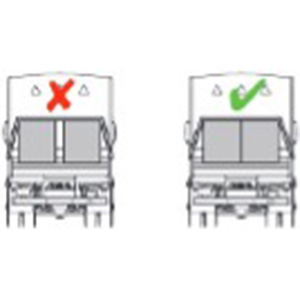
Choosing The Correct Securement System
The securement system must be appropriate for the cargo’s size, weight, and shape.
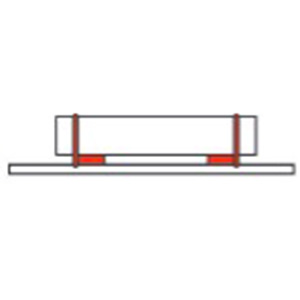
Tiedown Placement
If a spacer is utilized, the tiedown should be placed as close as possible to the spacer. The tie-down should also be placed symmetrically over the length of the cargo.
Working Load Limit (WLL)
The Working Load Limit is the maximum load applied to the securement system under normal use (this is determined by the component’s manufacturer, as shown in the figure below).

Securing Bundles
Place in direct contact and provide blocking to prevent bundles from shifting towards one another.
Transporting Light Trucks to Heavy Machinery
When transporting any machine, first set the parking brake.
10,000 lbs. or less
Use at least two tie-downs at both the front and rear.
More than 10,000 lbs.
Restrain cargo using a minimum of four tiedowns, each with a WLL of at least 5,000 lbs. This will help prevent cargo movement in the side‐to‐side, forward, rearward, and vertical directions. Lower and secure all accessories (booms, loader, shovel, etc.)
Common Securement Equipment:
1‐inch ratchet strap to be used with a small lawnmower, ATV or building supplies less than 400 lbs.
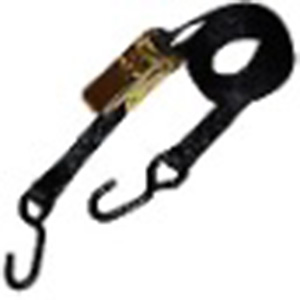
2‐inch ratchet strap to be used with UTV, hay, or building supplies less than 2,000 lbs.

Ratchet chain binder to be used with light trucks to heavy machinery. Easy to tighten and loosen as needed and will not self- loosen.

Lever-action binder not to be used on highway loads, difficult to tighten and loosen. THE HANDLE MUST BE SAFELY TIED DOWN; IF NOT PROPERLY SECURED, IT MAY SELF‐LOOSEN.

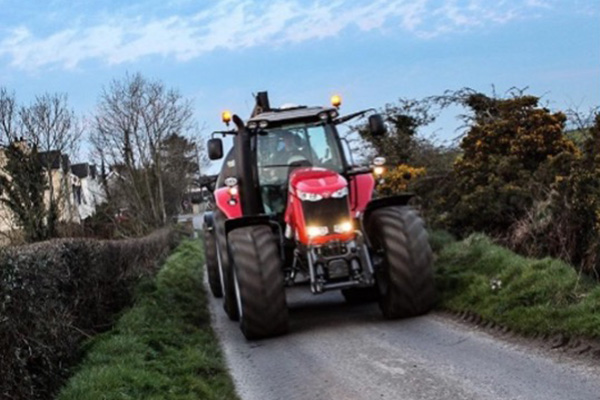
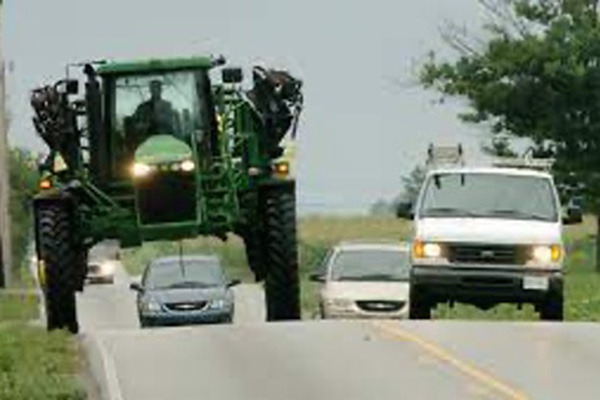
Roadway Safety
Description
The objective is to provide basic information regarding roadway safety pertaining to common hazards associated with operating farming equipment and other agricultural vehicles on the roadways.
Common Hazards
- Slow-moving vehicles cause an increase in rear-end collisions. They also encourage passing, which can be dangerous on rural roads.
- Passing can be quite hazardous because farm equipment tends to be wider than the lanes of the road.
- Poor visibility of farm equipment often occurs because rural roads are poorly lit.
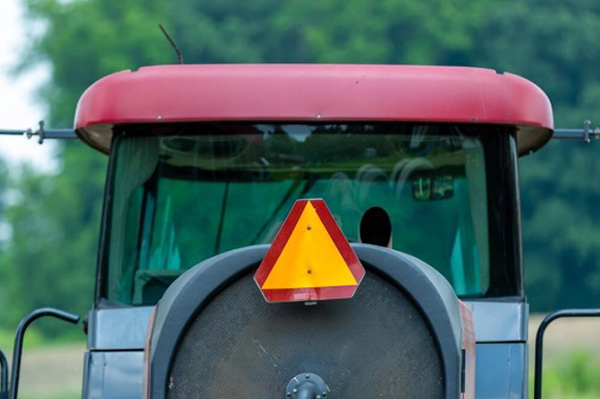
Recommended Protective Equipment
- Slow-moving vehicle signs
- Flags for long loads
- Working lights and flashers
Driving Farm Equipment On Roadways
Preparing equipment for travel
- Ensure that all roadway lights work before entering a roadway. You want to be as visible as possible to other drivers.
- Follow all traffic laws, including using turn or hand signals and operating at a safe speed.
- If your tractor has a ROPS, make sure that you are wearing your seatbelt.
- Lock the left and right brakes to ensure you don’t accidentally use only one brake and cause the tractor to swerve.
- Ensure your slow-moving vehicle sign is visible on equipment that travels under 25 mph.
Traveling with equipment
- Use rural roadways, when possible, to avoid creating traffic on busier roadways.
- Travel during non-busy times to ensure you encounter as few drivers as possible on the roadway.
- If possible, have both a lead and follow car to restrict how close other drivers can get to agricultural equipment.
Interacting With Farm Equipment On Roadways
- Be extremely cautious when passing farm equipment on roadways. Farm equipment tends to be wider than the lanes and can be difficult to see around to pass.
- Avoid coming to sudden stops in front of farm equipment when at all possible.
- Most importantly, be patient with farmers. After all, they are just trying to do their job!
Pesticide Safety
Description
This fact sheet aims to provide the reader with valuable information about how to handle, use, and dispose of pesticides safely.
Why?
- To protect people, both yourself andothers.
- To protect the environment, including, but not limited to, water, plants, and animals.
Human Harm
Humans can be poisoned or injured by pesticides. Poisoning results when pesticides enter the body and cause internal harm. Injury results when pesticides cause damage to the external body. Toxicity level is the measure of how harmful a pesticide is. Toxicity is dependent upon the amount of pesticide exposure. Exposure is when a pesticide comes in contact with any part of a person’s body.
Responding To Poisoning Emergency
- Stop pesticide exposure
- Call for emergency help
- Check the label to determine if any actions can be taken before help arrives.
Skin Exposure
- Drench skin with water
- Remove PPE/contaminated clothing
- Wash skin/hair thoroughly with mild detergent
- Cover the victim and prevent overheating or becoming too cold
- Use a soft, loose bandage for burns.
*Do not apply creams or powders. *
Ocular Exposure
- Quickly wash your eyes with a gentle drip of
clean water for 15+ minutes.
*Do not add anything to the water! *
Inhalation of Pesticide
- Get the victim and anyone else to fresh air.
- Loosen tight clothing and use artificial
respiration if necessary.
*Use an airway tube if available to prevent
direct contact in mouth‐to‐mouth. *
Mouth Exposure
- Rinse mouth
- Give the victim lots of water or milk to
drink.
*Only induce vomiting if instructed on the label.*
Label and Classification
Pesticide labeling is the law and must be followed. There are two classifications for pesticides: unclassified and restricted.
Unclassified, or general use, does not require a pesticide certification to purchase and use.
Restricted, or RUP (Restricted Use Pesticide), pesticides could cause harm to humans and the environment and require a certificate to buy and use.
When applying any pesticides, remember that the label is the law

Landmover, ATV and UTV
Description
The objective is to provide basic information regarding the safe use of push‐type and gear‐driven lawnmowers, All-Terrain Vehicle (ATV), and Utility Task Vehicle (UTV).
Lawnmover Safety Basics
- PPE: closed‐toed shoes, ear, and eye protection
- Do not pull the mower backward or mow in reverse
- Always turn off mower engine when removing any grass, cleaning clogged chutes, or crossing gravel paths and roads
- Do not allow children to ride as passengers
- Use mowers with adequate lighting or daylight
- Keep all guards, shields, switches, and other safety devices in proper working order
Pre-Operational Safety Checks
- Is the chosen type of mower appropriate for the task? Are there other tools better equipped for the job?
- Is the operator of the tool trained on how to operate the push mower safely?
- Ensure mower deck and discharge are free of foreign materials
- Ensure that the blade(s) are undamaged, unbent, and in proper working order. The nut is tight, and the blade(s) is (are) not loose
- Set height adjustment levers to the proper height. Ensure levers can move freely and are undamaged.
Operation Of Machine
- Check for bystanders.
- Move the on/off switch to on, close the choke, prime the fuel line, grasp the pull cord handle firmly, and pull until the tool starts, then place the choke back in the open position.
- When operating near or on loose material, be sure to position the mower so that the discharge is away from bystanders, fragile objects, and the road.
- If operating near a roadside, look up often to ensure there are no oncoming cars.
- Mow with discharge pointing away from trees to prevent ricochets of projected materials from the mower.
Ending Operations
- Park on even ground in a safe location out of access to untrained persons and children
- Stop the ride on the mower and shift the gear selector to the park position.
- Raise and secure the cutting blades.
- Lock the parking brake.
- Stop the engine and remove the keys.
- Remove any materials from around the engine and mowing deck
- Remove the grass catch bag and empty its contents
ATV Safety Basics
- DOT-compliant helmet, goggles, long sleeves, long pants, over‐the‐ankle boots, and gloves
- Never ride on the paved road except to cross when safe and permitted by law
- Never ride under the influence of alcohol or other drugs
- Never carry passengers on a single‐rider ATV
- Ride an age-appropriate ATV
- Supervise riders younger than 16; ATVs are not toys
- Ride only on designed trails and at safe speeds
UTV Safety Basics
- Always keep legs and arms inside the vehicle
- Drive slowly and turn smoothly to avoid overturning
- Do not turn the vehicle in mid‐slope because of the increased risk of overturn
- Use appropriate speed on rough terrain
- Each passenger must ride in his/her seat
- Do not haul passengers in the cargo area
- Passengers must be tall enough to reach the handhold while their backs are against the seat and their feet are flat on the floorboards
- Be cautious when backing up because of pedestrians
- Ensure cargo/hauled materials are properly secured with attention to the center of gravity.
Grain Safety
Description
The objective is to provide basic information on grain safety and safety related to entrapment and engulfment in grain.
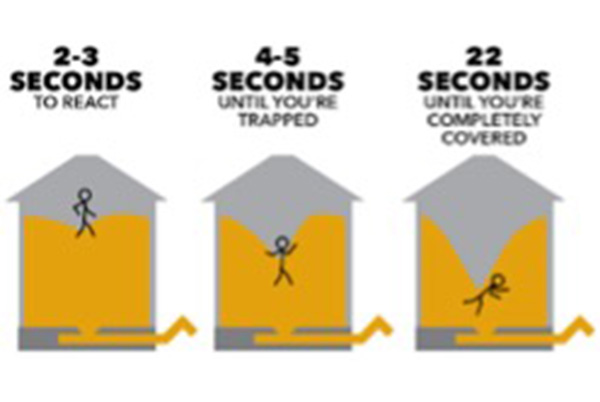
Grain Entrapment or Engulfment
Entrapment: When a person has sunk low enough into the grain, they cannot escape the grain without assistance from another person.
Engulfment: When a person has sunk low enough, their head is below the grain
It takes 2-3 seconds to react, 4-5 til you're trapped, and 22 til you're completely covered.
Causes of Entrapment or Engulfment
Flowing Grain: Moving grain acts like quicksand and moves in a conical motion when being removed from bins. This can result in a person becoming trapped quickly.
Grain Bridging: When grain becomes wet or moist, it begins to mold and form a crust on the surface. When grain is removed, a cavity will form beneath the crusted grain. Sometimes, workers may enter a bin with a grain bridge, and the grain will collapse, resulting in the worker being engulfed in grain.
Grain Wall Collapse: Grain walls form when wet grain molds and sticks together on the grain bin walls. If a worker enters the bin to knock down a grain wall, the grain may fall on the worker, resulting in engulfment.

Avoiding Entrapment or Engulfment
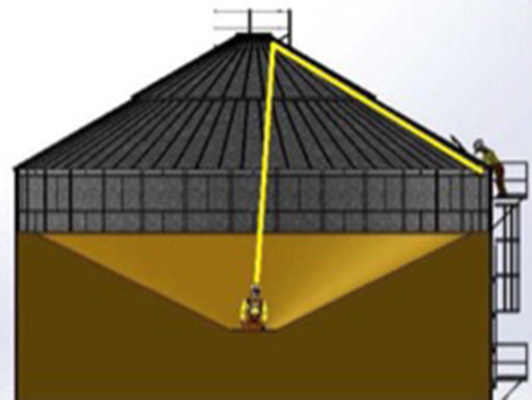
Target Zero Entry: Avoid having to enter a grain bin at all costs.
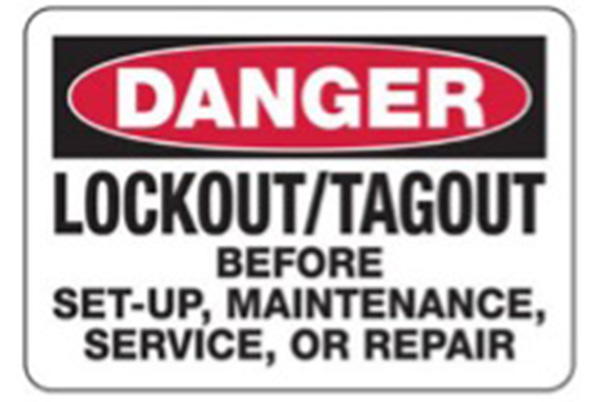
Lockout/Tagout: Programs ensure all equipment associated with adding or removing grain from a bin is shut off and cannot be turned on while a person is in a bin.
Never Go in Alone: Always have at least three people present when entering a bin: the bin entrant, a bin attendant, and an outside communicator. This allows eyes to be on the person entering the bin and communicating if an emergency does occur.
Harness and Anchor Points: Before entering a bin, ensure that all appropriate Personal Protective Equipment (PPE) is present, including a harness with a lanyard. In an emergency, a harness may be the only factor preventing a person from sinking below the grain surface.
Electrical Safety
Description
The objective is to provide basic information regarding electrical safety, dealing with the height of overhead powerlines, wiring facilities, and the use of extension cords.
Overhead Lines
Based on the National Electrical Safety Code (NESC) and the National Electric Code (NEC):
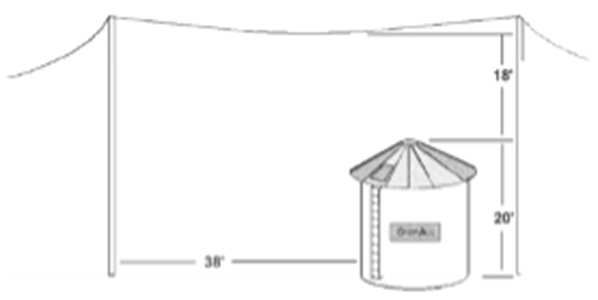
Portable Auger Systems
Overhead lines must be at least 18 feet above the tallest point on the grain bin and the loading side of the grain bin; the post must be a minimum of 38 feet from the bin.
Fixed Grain-Handling Systems
Overhead lines must be at least 12.5 feet above the structure's roof and not easily accessible by people. If the roof is easily accessible, the height of the lines must be at least 18 feet above the highest point.
Roadways for Agricultural Equipment
Overhead lines must be at a minimum of 18.5 feet above the ground. Ensures the tractor or implements do not come in contact with overhead lines.
Rooflines
8-foot clearance is needed from any roofline that is easily accessible.
Wiring Agricultural Facilities
Non-metallic Sheathed Cable
"Type NMC" or "UF" cable is recommended for damp environments, which can occur in agricultural facilities.
The gauge of cable is determined by the length of run and the power demand of the equipment.
| Conductor Size (AWG No.) | Maximum Allowable Amps | ||
|---|---|---|---|
| Cable Type | Copper | Aluminum | Fuse Size |
| NMC, UF | #14 | #12 | 15 |
| #12 | #10 | 20 | |
| #10 | #8 | 30 | |
Metal or PVC (plastic) conduit provides extra protection for cables from livestock, rodents, and general wear. PVC is preferred due to its resistance to corrosion and is less expensive.
Electrical cables need to be in open areas for inspection, and any switches or other electrical components should be out of reach of livestock.
Ground-Fault Circuit Interrupters (GFCI)
- GFCI is a circuit breaker designed to prevent shock to people or animals in wet or damp conditions.
- Any equipment plugged into a GFCI protected receptacle will have ground-fault protection.
- Do NOT remove the GFCI prong on electrical plugs.
Extension Cord Use Checklist
- Do not use in wet areas.
- Do not try and repair a damaged extension cord. Replace the cord.
- Keep cords away from sharp objects, heat, oil, and other solvents that could damage the insulation.
- Always check extension cords for damage before use.
- Do not overload extension cords.
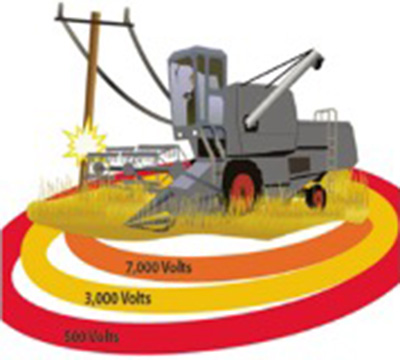
Step Potential
- Step Potential is voltage between the span of one step
- Voltage is highest at the source and fades as the energy moves across the ground
- Stepping on two difference voltages at the same time may electrocute you
- if you see a downed line, the safest place is inside the cab or on the equipment.
If the equipment you are in hits a utility pole the surrounding area can become energized
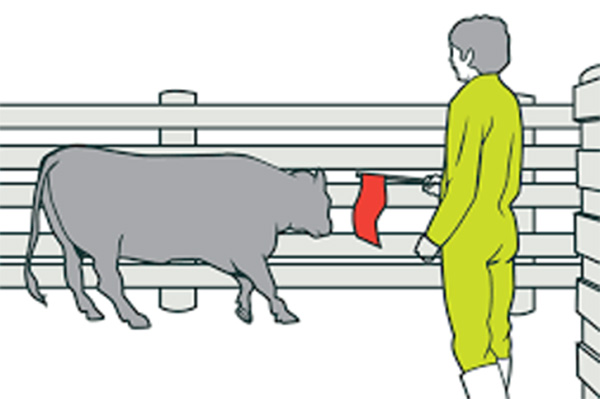
Animal Safety
Description
The objective is to provide basic information regarding animal safety pertaining to common hazards associated with livestock, how to approach livestock, and how to operate equipment around animals and livestock.
Common Hazards
- Getting stepped on, trampled, bitten, or kicked.
- Being pinned to a solid surface.
- Bacterial infections can be passed from livestock to humans.
- Can be extremely harmful to pregnant women working with livestock.
- Livestock mothers may become protective of their young when approached.
Recommended PPE For Livestock
- Closed-toed shoes (often rubber boots)
- Long pants
- Long-sleeved shirt
- Gloves (if necessary)
- Safety glasses
Approaching Livestock
How to Approach
- Never surprise the livestock. Ensure that the animal and those around the animal are aware that you are present.
- Do not sneak up behind the animal. Sneaking up on an animal could spook it and cause them to act out of fear.
- Always pay attention to where the animal is to ensure you do not find yourself in a corner.
- Always have an exit plan. Make sure you plan to escape in the event of an emergency.
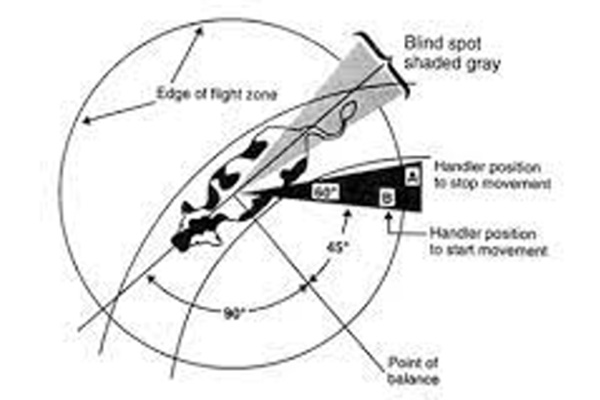
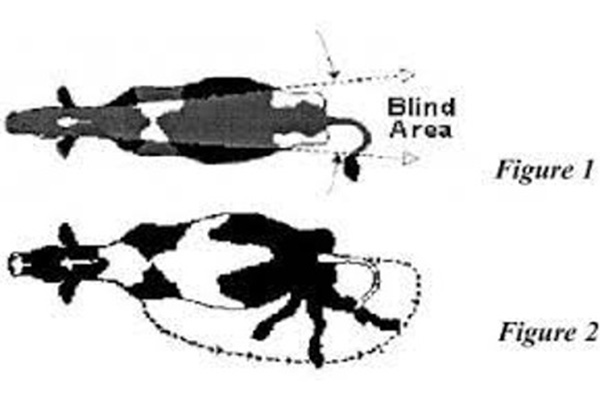
Blind Spots
- Every animal has a different blind spot, and it is important to know where the animal's blind spots are before approaching the animal.
- Always approach an animal calmly from the front if you do not know where the animal's blind spot is.
Equipment and Livestock
- Equipment may cause livestock to spook, causing harm to others around the area.
- Always be aware of where livestock and others are when using equipment around livestock. Often, the equipment has blind spots that might prevent the operator from seeing livestock in their path.
- Ensure that the operator knows where livestock are located when starting equipment. Some equipment may be loud and spook the livestock.