

Complex Tags
Improperly structured tags may require manual repair by creating new tags and modifying the tag tree. The process for creating new tags and nesting common complex tags is outlined below.
Creating Tags
To create a new, empty tag:
- Determine where you want to place the tag.
- Select the Tags element at the root of the tag tree to place the new tag at the end of the tag tree.
- Alternatively, select a nearby tag in the tag tree. The new tag will be placed following the selected tag.
- From the Options menu, choose New Tag…
- Select the tag type and provide an optional title.
- Select OK.
After creating a tag, move it to its appropriate position as needed by dragging and dropping (or cutting and pasting).
Links
Links require an object reference, Link - OBJR, to function properly.

If the object reference is missing, Acrobat's Accessibility Checker will report a failure for tagged annotations. To resolve this issue:
- Select Find from the Options menu.
- Select Unmarked Annotations in the Find dropdown.
- Choose to search a single page or the entire document.
- Select the Find button.
- When an unmarked annotation is found, select Tag Element.
- Repeat until all unmarked annotations are tagged.
Alternatively, recreate the link:
- Right-click the link in the document view and select Delete Link.
- Select the link text.
- Right-click the selected text and choose Create link... in the context menu.
- Choose the link action to Open a web page and select Next.
- Enter the URL for the link.
Lists
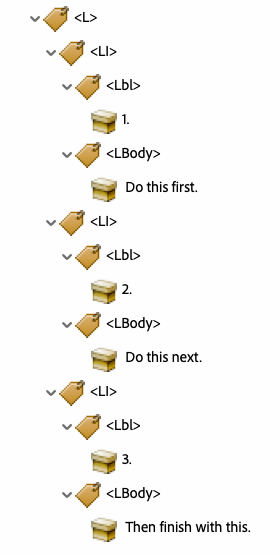
Lists require a specific tag structure:
- A list tag,
<L>, contains the entire list's structure. - List item tags,
<LI>, are nested directly within a list tag. - Label tags,
<Lbl>, are nested directly within a list item tag.- Label tags contain a list item's label (bullet, number, etc.) Labels are not required for list items. However, without them, some assistive technologies may not announce the list.
- List body tags,
<LBody>, are nested directly within a list item tag.- List body tags contain the list item's actual content.
- If a label is provided, put the list body after the label.
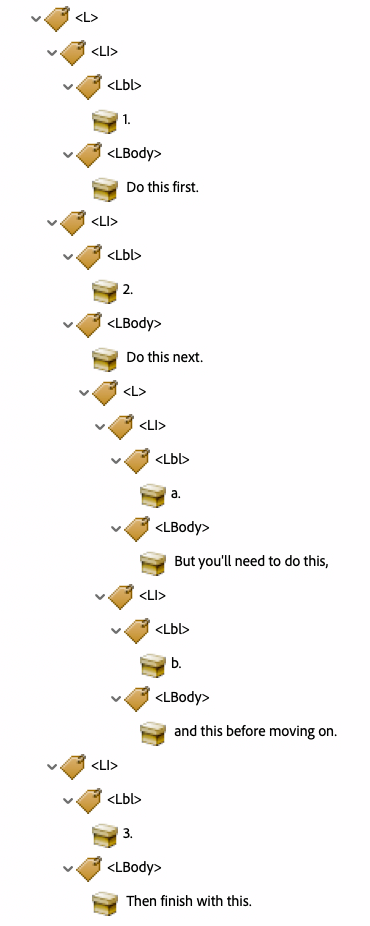
- Nested lists can be created by nesting a new list within the list body.
- If a list spans more than one page, group all tags associated with that list in a single
<L>tag.
- Do this first.
- Do this next.
- Then finish with this.
- Do this first.
- Do this next.
- But you'll need to do this,
- and this before moving on.
- Then finish with this.
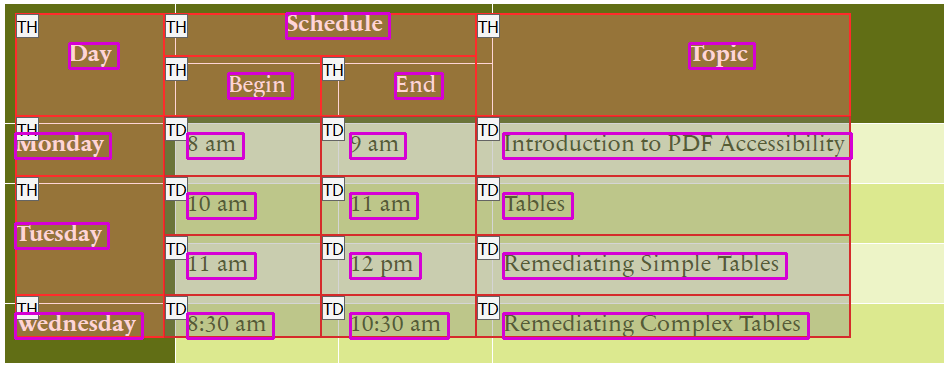
Tables
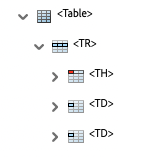
Tables require a specific tag structure:
- A table tag,
<Table>, contains the entire table. - Table row tags,
<TR>, are nested directly within the table tag. - Table header cell tags,
<TH>, are nested directly within table row tags. - Table data cell tags,
<TD>, are nested directly within table row tags. - If a table spans more than one page, group all tags associated with that table in a single
<Table>tag.
Create new tags as needed to ensure the tag structure is correct, content is placed in the appropriate tags and table headers are defined. Remember to back up your work frequently!
Table Editor
Using Acrobat's Table Editor, authors can review and modify table structures. To activate the Table Editor, right-click a <Table> tag in the tag tree and select Table Editor from the context menu. Alternatively:
- Open the Reading Order tool.
- Using the mouse, select a table element within a table.
- Select Table Editor in the Reading Order tool.
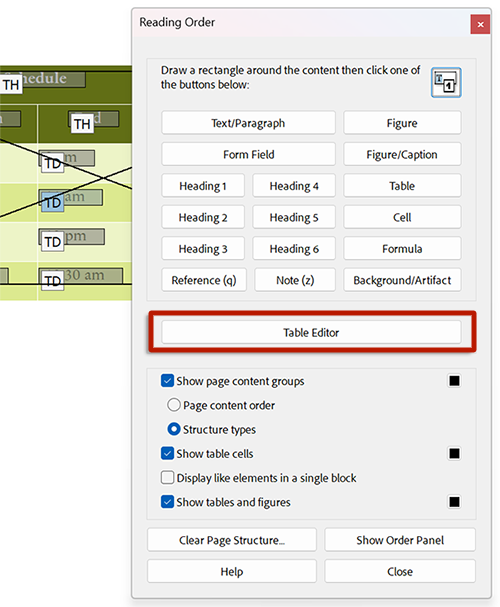
When the Table Editor is active, the table's cells are highlighted with different colors to indicate borders, header cells, data cells and selected cells.
Right-click any cell to access a context menu to manage Table Cell Properties and Table Editor Options.

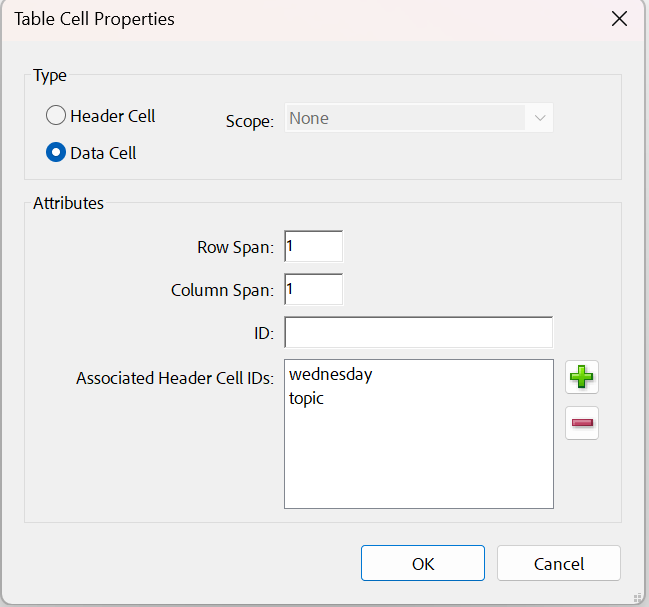
The Table Cell Properties dialog allows authors to define the following:
- Type: Header Cell, Data Cell and Scope
- Attributes: Row Span, Column Span, ID and Associated Header Cell IDs
The Table Editor Options allow authors to customize the Table Editor's colors and show or hide cell types.

Click outside of the table's border to dismiss the Table Editor.
Complex Tables
Headers
Complex tables require table cells to be explicitly associated with their headers. This association is implicit for simple tables.
First, define the scope and an ID for each header cell in the table:
- Open the cell's Table Cell Properties.
- Set the following properties:
- Scope: Column, Row, or Both
- ID: provide a unique identifier
Tip
Instead of providing your own unique identifier for each table header, you can automatically generate header IDs. With the Table Editor active, right-click in the table and select Auto Generate Header Cell IDs from the context menu.
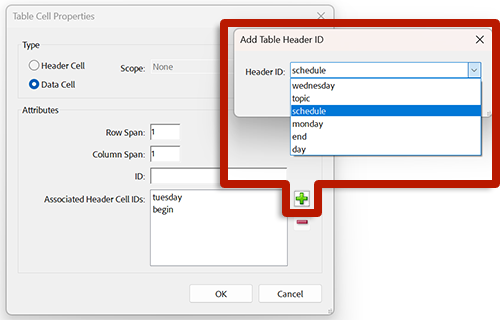
Next, associate each cell in the table with its respective headers:
- Open the cell's Table Cell Properties.
- For each corresponding header cell, select the Add button and choose the appropriate Associated Header Cell ID.
Tip
To update multiple cells at once, select the cells by clicking and dragging with the mouse and then right-click on the selection. Alternatively, hold the Shift key while clicking to select multiple cells. This technique is useful for defining the scope or type of multiple cells. It can also be used to associate a column or row of data cells with their header. Unfortunately, this technique will not work to associate data cells with both column and row headers: the group of cells selected cannot contain conflicting header associations.
Merged Cells
Set the following Table Cell Properties for all merged cells:
- Row Span: the number of rows the cell spans
- Column Span: the number of columns the cell spans
